Hello!!!
I haven't forgotten about the blog! In fact the thought of it has been hovering over me and weighing me down, it seems like on a good week I will post 3 times, which would be ideal, but on bad a week I don't post anything juicy or at all :-(
I bet you were expecting lots of adorable cat photos, but you don't even get that, sorry. I have been busy with something all this time, literally, always cleaning something, shopping for something, looking for something, organizing something, going somewhere for something... I did start a couple of DIYs but until they are finished, I don't want to put them here.
Anybody else excited about the holidays?? Hellz yez. When growing up we always had a big dinner party with games and all the family would get together, aunts, uncles, grandparents, cousins, it was awesome and hence I always get a warm homey feeling about Christmas. This year we are hosting dinner for 7 people, and it caught me a bit off-guard how quickly it was suddenly here!
I promise to report back after xmas with gift and dinner details ;-)
HAPPY HOLIDAYS EVERYONE!!!

Thursday, December 23, 2010
Tuesday, December 14, 2010
DIY simple upholstering project
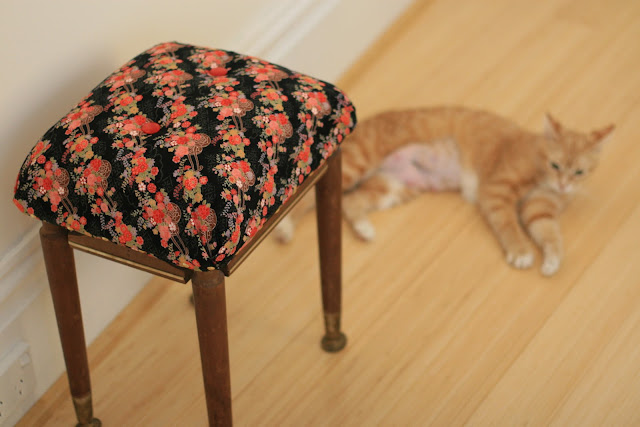
Before I get started, I wanted to announce that the chosen name for that precious kitty is Murka. It was suggested by M's mom and it is a common name for female cats in Russian speaking countries. It means something along the lines of "girl who purrs". At least that is what M says, and I guess I have to trust him on this one because I really like the name. You see, the cat is a purring machine, it just doesn't stop purring, so it is definitely fitting.
Next up is my first attempt at upholstering something! Remember that little stool that I wanted to pair up with my desk? (bottom photo). Well I finally got around it and here it goes.
You will need: a small stool, a pillow or pillow stuffing large enough to fit the stool, scissors, decorative buttons and fabric, a large needle, thread, upholstering tacks/nails and a hammer.
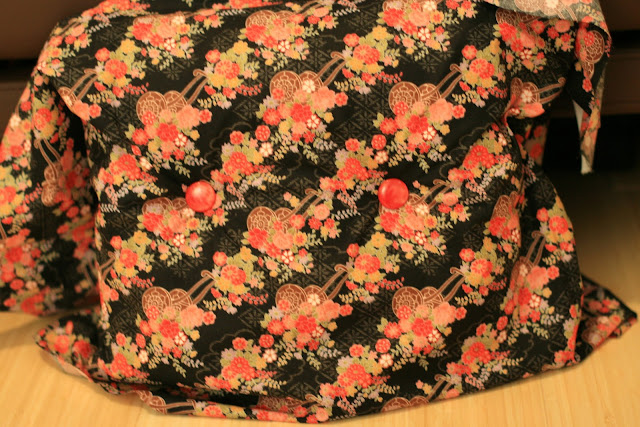
I took my needle and thread and marked the places where I would like my buttons to go, also tightened the threat with a little knot in order to make little dents on the pillow.

I cut the fabric so that it would cover one face of the pillow, and also go just over the edges of it. I held it on the pillow using pins, and proceeded to attach my buttons.

This is a Japanese fabric that I found on sale at the Beehive Gallery...
Then I placed the pillow, fabric side up, on the stool and measured the length of the edges. I started pushing some of those upholstering tacks through the fabric to mark where the edge should be.
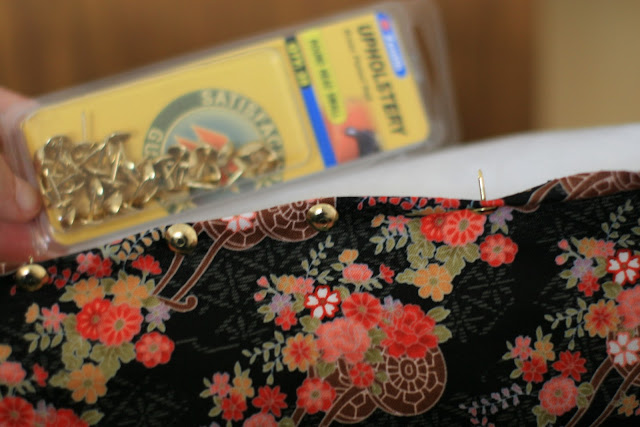
Start hammering those suckers in! Always start with the center, and do edges first, leaving room around the corners, leave those for last.

I wanted the fabric to be nice and taught, but the pillow wasn't firm enough, so I just went meh... It fits nicely around the pillow, but it is not by any means taught... maybe next time I should stack up two of those pillows. NOTE: the tighter you make it, the harder it will be to keep the nails in place for hammering.
Then comes the corners... pardon my French but those corners were a bit#h. I took me a long time to figure out what to do, and I am still not really convinced that I did it correctly... I was learning as I went... but basically I tried pulling in the corner tight and folded it under the pillow. Then I brought what I had left over from the edges and tried to fold them nicely and around the corner.
I know it sounds complicated, to me it was, maybe a picture would help:

It is harder than it looks, trust me. Also, the corners came out all different, gives it away that this was a "craft" project.
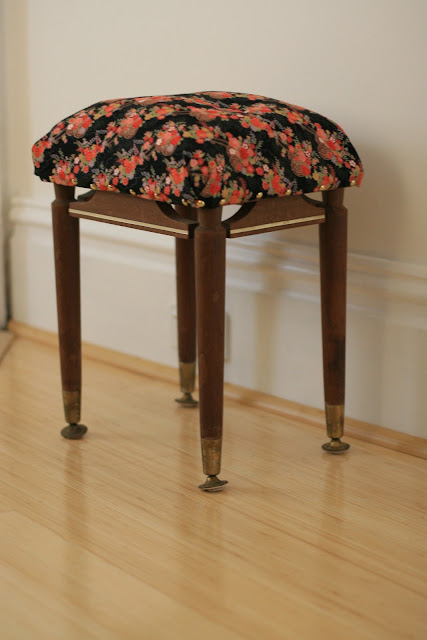
And finally the end result!
Next up is my first attempt at upholstering something! Remember that little stool that I wanted to pair up with my desk? (bottom photo). Well I finally got around it and here it goes.
You will need: a small stool, a pillow or pillow stuffing large enough to fit the stool, scissors, decorative buttons and fabric, a large needle, thread, upholstering tacks/nails and a hammer.
I took my needle and thread and marked the places where I would like my buttons to go, also tightened the threat with a little knot in order to make little dents on the pillow.

I cut the fabric so that it would cover one face of the pillow, and also go just over the edges of it. I held it on the pillow using pins, and proceeded to attach my buttons.

This is a Japanese fabric that I found on sale at the Beehive Gallery...

Then I placed the pillow, fabric side up, on the stool and measured the length of the edges. I started pushing some of those upholstering tacks through the fabric to mark where the edge should be.

Start hammering those suckers in! Always start with the center, and do edges first, leaving room around the corners, leave those for last.

I wanted the fabric to be nice and taught, but the pillow wasn't firm enough, so I just went meh... It fits nicely around the pillow, but it is not by any means taught... maybe next time I should stack up two of those pillows. NOTE: the tighter you make it, the harder it will be to keep the nails in place for hammering.
Then comes the corners... pardon my French but those corners were a bit#h. I took me a long time to figure out what to do, and I am still not really convinced that I did it correctly... I was learning as I went... but basically I tried pulling in the corner tight and folded it under the pillow. Then I brought what I had left over from the edges and tried to fold them nicely and around the corner.
I know it sounds complicated, to me it was, maybe a picture would help:

It is harder than it looks, trust me. Also, the corners came out all different, gives it away that this was a "craft" project.
And finally the end result!

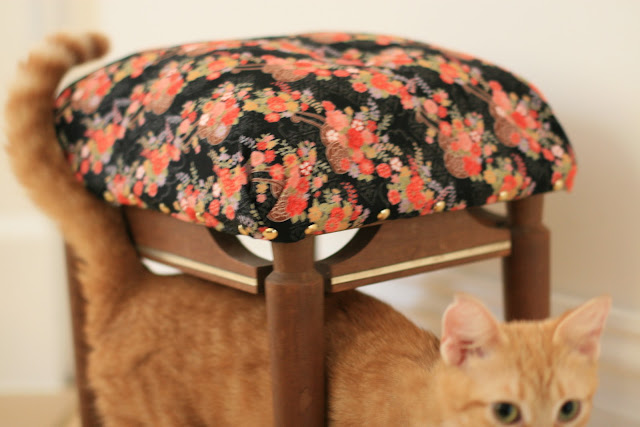
The feet are not crooked, they are adjustable is all. This little gal was helping me all along and she wanted to be in the pictures:


So that's the stool :-)
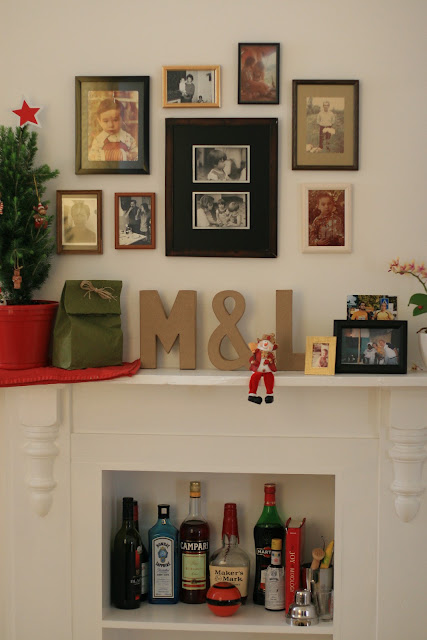
While I was at it, I took some photos of our favorite part of the house. This is the mantle in our living room, all decked out with a Holiday tree and family photos.

Maybe one day I can show you the rest of our mess...
Saturday, December 11, 2010
Help us choose a name!
This little cutie needs a name! She is one year old, female, very cuddly, confident and curious. Some of the names we are considering are: Sheila and Sydney.
Please help us choose or suggest a name of your own!!!

Please help us choose or suggest a name of your own!!!

Wednesday, December 8, 2010
Lemon thyme vinaigrette
As I mentioned on the last post, we had the chicken with a salad of baby greens, rocket, tomato and green beans. I thought it would be nice to complement the lemon chicken with some lemon thyme in the salad, and Google gave me this.

Once again, I didn't have all of the fancy ingredients so I improvised with what I had already. I think it came out excellently, it is lemoney and thymey and refreshing and mmm, good.

I like to prepare vinaigrettes in a jar so I can mix it by shaking and also to save the left overs in the fridge.
[insert witty closing remark here]
Once again, I didn't have all of the fancy ingredients so I improvised with what I had already. I think it came out excellently, it is lemoney and thymey and refreshing and mmm, good.
I like to prepare vinaigrettes in a jar so I can mix it by shaking and also to save the left overs in the fridge.
[insert witty closing remark here]
A recipe in pictures
I was amassing large quantities of rosemary and lemon thyme, both of which have been put to fine use.
I give you... Rosemary, garlic and lemon chicken.
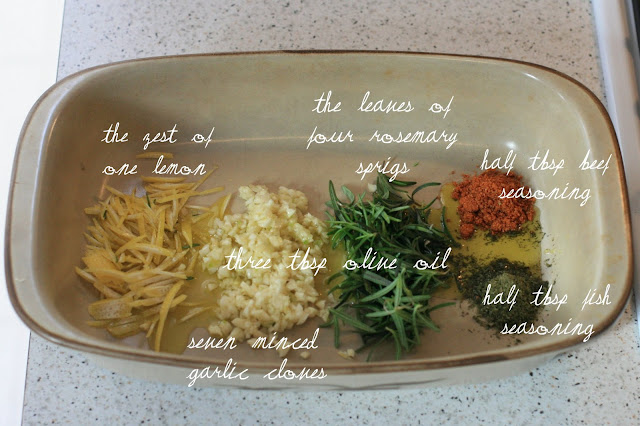
The recipe asked for chicken seasoning, which I had none. So I looked in the pantry and I figured that half of beef seasoning plus half of fish seasoning has to make one fine delicious chicken seasoning. Right?

The you put your dish in the oven for 25 minutes. Then you take it out. Then you squeeze one lemon and pour a half cup of white wine on top of it. Then you put it back in the oven, turn it off and leave it for 5 more minutes.
Voila.

Yes I am aware the chicken in the photo looks like crap, but I assure you that once you serve it on the plate next to a nice little salad, it is ready for gourmet magazine. It tasted pretty good too!
M wished the chicken was crispier.
I wished M would keep certain opinions to himself.
The chicken wished we were vegetarians.
{I will post the lemon thyme recipe tomorrow, that one is a quickie}
I give you... Rosemary, garlic and lemon chicken.
The recipe asked for chicken seasoning, which I had none. So I looked in the pantry and I figured that half of beef seasoning plus half of fish seasoning has to make one fine delicious chicken seasoning. Right?
The you put your dish in the oven for 25 minutes. Then you take it out. Then you squeeze one lemon and pour a half cup of white wine on top of it. Then you put it back in the oven, turn it off and leave it for 5 more minutes.
Voila.
Yes I am aware the chicken in the photo looks like crap, but I assure you that once you serve it on the plate next to a nice little salad, it is ready for gourmet magazine. It tasted pretty good too!
M wished the chicken was crispier.
I wished M would keep certain opinions to himself.
The chicken wished we were vegetarians.
{I will post the lemon thyme recipe tomorrow, that one is a quickie}
Monday, December 6, 2010
Cons of living in Australia #54
Most pople dry their laundry outside (so do we) and hence sometimes you will end up with bugs in your clothes :-S
Monday, November 29, 2010
Offline again
G'day mates,
We're going on vacation tomorrow and until Sunday. We'll be in Cairns, Queensland. It is almost all the way north and very close to the Great Barrier Reef National Park.
I haven't been to the beach much in Australia since we're still "settling in" and we try to make our weekends more productive than relaxing, so I'm really looking forward to this.
I found a casual job at a cupcake shop. Don't get too excited it is nothing glamourous, in fact there is a really stupid hat and lots of cleaning involved. I am still looking for a more serious job but it is a tough time of year around christmas, there's very little hiring they tell me. But I also got tired of sitting at home so it's nice to get out every once in a while and earn a little moolah. I will also be volunteering at our local food cooperative starting next week.
But enough about work, I need to pack for the beach.
Friday, November 26, 2010
What day is it?!
Get ready for another ranting post.
This week went by in a blink!!! We spent last weekend in lovely Melbourne and after we got back I went to take a nap and woke up on Friday. It is Friday already!!?!? Basically I missed out on free movie Wednesdays and on Thanksgiving.
Would it be ok to just eat too much just like any other day of the year to make up for it?
This week I have been unpacking more and more of our clothes and it has me feeling aweful about it. Normally I have a rule about clothes and that is if I haven't worn in one year, it goes to the donation bin, this keeps my closet updated and uncluttered. But then I have clothes that I keep to wear only once a year, or under very special circumstances. Like the "paint-tshirt", do you have one too? An old raggedy shirt you are saving for that day when you get up and feel like painting a room or a piece of furniture? Yeah right...
I also have a few "beach-tops", even though until now I hadn't lived near a coast for 7 years... And let's not forget the "pj-tshirts" which are a stack of ugly, yet comfortable and publicly appropriate shirts that I keep in case I sleep over at a friend's house while traveling. WHAT?! Yes, I am ridiculous and irresponsible and until I write it down it won't be fixed, so I am writing it down now. I am going to sell and donate a bunch of clothing items that I paid a lot of money to have shipped overseas. I wonder how much paint shirts sell for these days...
Do you guys also have clothes you save for specific random purposes?
Also I got this treasure in the mail today...

Now, is that what you call a wise marketing decision?
(Probably since now she got free publicity on my blog...)
This week went by in a blink!!! We spent last weekend in lovely Melbourne and after we got back I went to take a nap and woke up on Friday. It is Friday already!!?!? Basically I missed out on free movie Wednesdays and on Thanksgiving.
Would it be ok to just eat too much just like any other day of the year to make up for it?
This week I have been unpacking more and more of our clothes and it has me feeling aweful about it. Normally I have a rule about clothes and that is if I haven't worn in one year, it goes to the donation bin, this keeps my closet updated and uncluttered. But then I have clothes that I keep to wear only once a year, or under very special circumstances. Like the "paint-tshirt", do you have one too? An old raggedy shirt you are saving for that day when you get up and feel like painting a room or a piece of furniture? Yeah right...
I also have a few "beach-tops", even though until now I hadn't lived near a coast for 7 years... And let's not forget the "pj-tshirts" which are a stack of ugly, yet comfortable and publicly appropriate shirts that I keep in case I sleep over at a friend's house while traveling. WHAT?! Yes, I am ridiculous and irresponsible and until I write it down it won't be fixed, so I am writing it down now. I am going to sell and donate a bunch of clothing items that I paid a lot of money to have shipped overseas. I wonder how much paint shirts sell for these days...
Do you guys also have clothes you save for specific random purposes?
Also I got this treasure in the mail today...
Now, is that what you call a wise marketing decision?
(Probably since now she got free publicity on my blog...)
Monday, November 22, 2010
Traveling with Quantas
Most airlines: "We will be serving refreshments in a few moments"
Quantas airlines: "We will be serving morning tea in a few moments"
Checking the emergency procedures on Quantas Boeing 767 aircraft:
Please refrain from using cel phones, beepers, other kinds of radio transmitters and gremlins.

We sure hope you enjoy the oxygen mask in case of cabin loss of pressurization.
Children sized life vests are available in case of an emergency water landing. By emergency water landing we mean water play time. Also available for children are water guns, floaties and trained dolphins.
Always have an optimistic attitude when faced with death!
Quantas airlines: "We will be serving morning tea in a few moments"
Checking the emergency procedures on Quantas Boeing 767 aircraft:
Please refrain from using cel phones, beepers, other kinds of radio transmitters and gremlins.

We sure hope you enjoy the oxygen mask in case of cabin loss of pressurization.
 |
| "weeeeeeee oxygen masks! lol!" |
Children sized life vests are available in case of an emergency water landing. By emergency water landing we mean water play time. Also available for children are water guns, floaties and trained dolphins.
 |
| "Mommy can I keep my vest in heaven? - Yes you can Timmy, now go play with the nice sharkies" |
Always have an optimistic attitude when faced with death!
Tuesday, November 16, 2010
Weird dreams series #67
I dreamed I was falling through a seemingly bottomless dark abyss and there were cupcakes all around me. Finally I saw the bottom and realized it consisted of sharp rock, stalagmites and more cupcakes.
Right before dying a sweet death I woke up in a jolt, then wiped off all the buttercream and cake crumbs off my face and onto the pillow. Took one last gulp of cherry chocolate ice cream milkshake and went back to sleep.
Right before dying a sweet death I woke up in a jolt, then wiped off all the buttercream and cake crumbs off my face and onto the pillow. Took one last gulp of cherry chocolate ice cream milkshake and went back to sleep.
Monday, November 15, 2010
Garden update...
Harvest day!


I know what you are thinking: daaaaaaaaannnnnng guuurl!
The coriander grows insanely fast, followed by the lemon thyme, the parsley and the basil. The rosemary is lagging way behind, it honestly grows a bit too slow.
My herbs are alive! All of them in fact! they are alive AND delicious, to the point that the pests love them too!
Yeah, yeah, yeah. I was freaking out in my last garden post. I spoke to some garden avid friends and also went to my local nursery to discuss the matter of pests. The inevitable truth of the matter is, if you have delicious leaves growing outdoors, somebody is going to want to eat them. I just need to be on top of my garden to control the spreading of pests so I get to eat the herbs before they do!
Each herb has a different loving critter. White flies love my coriander and basil, aphids (the tiny green ones I spoke of before) are fans of the parsley, there are teeny little light brown worms (unidentified as of yet) who feast on the lemon thyme and fortunately the rosemary hasn't had any pests so far.
I am now using 2 products on the garden: the first is the extract of the pyrenthrum daisy, in spray form, which has been used as a pesticide for centuries. This controls all of my present pests and it works quite well, they start dropping dead and becoming compost within 10 minutes of spraying. The extract of the daisy is not meant for human consumption, and the manufacturer recommends not to harvest the day after spraying. Therefore I usually spray immediately *after* harvesting (about once a week). Alternatively you can also plant the pyrenthrum plant around and in between your plants and this will keep pests off, but the nursery didn't have those seeds, just the spray.
The second product I am successfully using is an eco-fungicide whose active ingredient is potassium bicarbonate. This is to treat and prevent powdery mildew and other forms of fungus (which you may not readily see on the ground, but can live attached to the roots or cause discoloration of the leaves). The fungicide comes in powder form and I dissolve about a teaspoon in 1 litre of water and spray it once a week (on a dry day). The fungus sometimes originates from overwatering, too much humidity and not enough air flow. I always let the ground dry completely before watering my plants again, but if your plants are outdoors and potted like mine, you simply cannot protect them from rain.
{harvesting your herbs}
Using some sturdy scissors cut the coriander and parsley at the base of the stem. More stems will grow from the ground up. The thyme and rosemary should be cut at the base of that branch, as more leaves/branches will branch off at random places. The basil grows strikingly like a binary tree, from each leaf two more will grow. Thus it is best to cut it at the base of the leave.
{storing and eating}
I soak my herbs in water for at least 20 minutes to make sure all uninvited guests will drown. Then I carefully inspect each leave and stem and in batches give them a couple of spins and rinses using a salad spinner.
The best way to store herbs in the fridge is wrapped in a damp paper towel inside a ziploc bag or tupperware. I read that you can freeze them for up to 3 months as well, and if you would like to dry them, it is best to do that right before the plants are blooming, when they are at their richest in delicious natural oils. I think I will try to do that when the time comes.
This post was very wordy and less picturesque, but I hope it was at least interesting and useful to someone out there...
Friday, November 12, 2010
1960's chest revisited
Remember my Italian treasure chest?
Pretty much everyone agreed that the old paper inside had to go, and go it did!
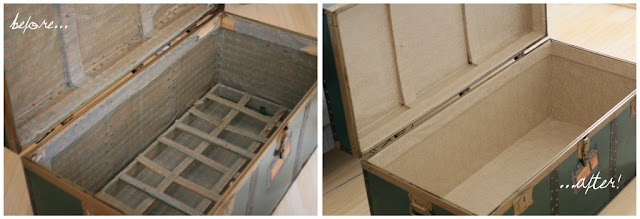
It took me a while, and it is FAR from perfect, in fact it was really awkward to cut and glue at times, and for some parts I ended up using many pieces of paper to cover a single area... I didn't want to do a DIY on this precisely because I sucked at it so much, I'm the one who needs a DIY!
One thing I can say is that it smelled... well... like it was 50 years old. You know that old musty grandparent house smell? Yeah, well it took about 6 sprays of Febreze (the Aussie version anyway, it's called Oust) to get rid of it, always letting it dry completely between sprays.
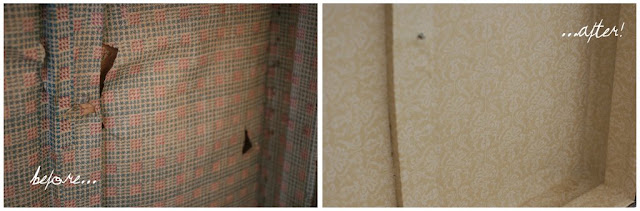
Hope you like it.
Have a nice weekend!!!
Pretty much everyone agreed that the old paper inside had to go, and go it did!
It took me a while, and it is FAR from perfect, in fact it was really awkward to cut and glue at times, and for some parts I ended up using many pieces of paper to cover a single area... I didn't want to do a DIY on this precisely because I sucked at it so much, I'm the one who needs a DIY!
One thing I can say is that it smelled... well... like it was 50 years old. You know that old musty grandparent house smell? Yeah, well it took about 6 sprays of Febreze (the Aussie version anyway, it's called Oust) to get rid of it, always letting it dry completely between sprays.
Hope you like it.
Have a nice weekend!!!
Thursday, November 11, 2010
More cupcakes!
We are attending a barbecue tonight which will also be attended by lots of men. And since there aren't a lot of men out there who appreciate vegetables, I decided to take matters into my own hands and make a couple of salads. I made a lot in hopes that there will be left overs and then I can eat them for the rest of the week... But who wants to read about salads anyway, let's talk dessert!!!
I also really wanted to make some cupcakes for tonight because... well who needs a reason for cupcakes?
These are chocolate cupcakes with vanilla frosting. The original recipe is completely vegan, but with mine I used real butter and cream cheese in the frosting instead of vegan substitutes.

Also just wanted to mention that using cream cheese makes the frosting super creamy and requires half the sugar than traditional recipes = creamier and not so overly sweet!

Check out my new carrying case, it holds up to 24 cupcakes. More goodness for everyone.

And on a side note, I was in a rotten mood last Tuesday and was super rude to my boyfriend and everyone who got on my way. Instead of getting angry M got me this:

Best. Boyfriend. Ever.
I also really wanted to make some cupcakes for tonight because... well who needs a reason for cupcakes?
These are chocolate cupcakes with vanilla frosting. The original recipe is completely vegan, but with mine I used real butter and cream cheese in the frosting instead of vegan substitutes.
Also just wanted to mention that using cream cheese makes the frosting super creamy and requires half the sugar than traditional recipes = creamier and not so overly sweet!
Check out my new carrying case, it holds up to 24 cupcakes. More goodness for everyone.

And on a side note, I was in a rotten mood last Tuesday and was super rude to my boyfriend and everyone who got on my way. Instead of getting angry M got me this:
Best. Boyfriend. Ever.
Monday, November 8, 2010
DIY cake stand
I saw this DIY on a different blog, but for the life of me I can't remember which one. I looked it up and it is actually a semi popular DIY, so no ground breaking techniques here.
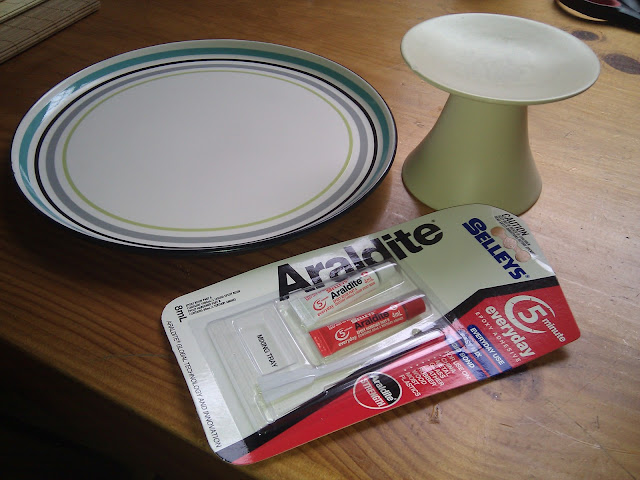


What you will need:
- A plate (any plate you like, mine was $0.50 from a thrift store)
- A candle holder (any candle holder you like, mine was $0.50 from the same place)
- Strong glue: I recommend super glue or epoxy
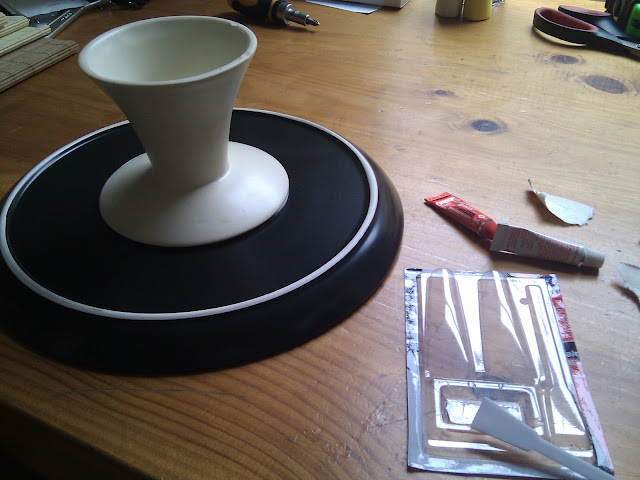
Clean your plate and candle holder and make sure they are dry.

Apply glue according to directions (fast if you can, since it will dry quickly) on the edge where both items will come together. Place the plate on top of the candle holder and apply some pressure. Best it is when you place a heavy book or cutting board on top and leave it for 30 minutes while it dries.

Finito.
By the way we finally got our shipment from Zurich and I was able to retrieve all of my bakeware. Of course I immediately had to make cupcakes to display the cake stand in use.
These are peach bourbon cupcakes (recipe here) and in my humble opinion they are scrumptious. The perfect hint of bourbon and peaches all in one. The recipe was for 12 cupcakes but my cups were a bit bigger than the norm so only 8 came out.
Monday, November 1, 2010
garden help!
So my herbs are growing at an excellent rate, and I have even enjoyed some basil and thyme already but now I have a problem :-(
There is a funny white mould or mildew growing under the parsley, but only under this one, the other herbs are fine.
What is worse, there are pests on the parsley too, teeny weeny little green guys. I don't even know if they move, but they are there.
This was a short lived success...
Edit: yes, I did look online already and it could be a number of things... I think I'll go to the nursery again and ask for help.
Saturday, October 30, 2010
1960's chest
I hit the jackpot today.
Mitchell Road Auction House is a warehouse full of beautiful junk. In the ground floor are items that have gone through some mild to serious tear and wear, but are still functional and/or beautiful in their own way. The items on this floor are very fairly priced and this is where we bought chairs for our kitchen table and a standing mirror last Saturday. We paid $AUD 116.50 for a set of 4 chairs and the mirror, all in good condition. The auction house adds 16.5% to the tag price for having found and stored the item in their store. That is why we paid that odd number.
The second floor of the building is full of gorgeous antiques and retro items that are in *excellent* condition, and I mean there is a lot of stuff that is 30 years old but looks as good as new. The items on this floor are significantly more expensive, but you could debate that they are also fairly priced due to the fact that they have been maintained so well.
In any case, I liked the place a lot and decided to pay another visit today just for kicks. Well my friends, I did not come home empty handed.

I found this GORGEOUS chest!!! I knew I wanted it the second I saw it. The price tag was AUD$65 and then I just had to have it! M and I had been talking about how it would be nice to find a coffee table item that could also serve as storage, so we thought a chest would be perfect. Since that discussion a couple of months ago, we have seen a few beautiful chests but they were $600+ and then some were $100 or so, but too simple and boring. I took a chance when buying this one today because M is not home, he went on a company retreat for the weekend. Man I hope he likes it as much as I do.
The chest still has stickers attached to it from its voyage. I find it so fascinating, it makes me giddy.


What I could gather from the stickers is that it came from Italy on the ship Galileo Galilei operated by the company Lloyd Triestino and it belonged to either a Mr. Iannello Rosario, or a Mrs. Rosario Iannello. Even the original lock is still attached and says "made in Italy", though you can open the chest because someone broke the lock mechanism.

So I googled "SS Galileo Galilei" and finding out about it was easier than I thought. This ship travelled between Genoa, Italy and Sydney, Australia, between the early 60's and the late 70's after which the ship changed name and operator several times.
I am so delighted with this chest! I paid 75 bucks for it but to me it is worth its weight in gold. I think I will visit the Mitchell Road Auction Centre as part of my Saturday routines from now on.
The insides of the chest are clearly worn out, and now I am trying to decide whether I should scrape off the old paper and attach my own new one, or if I should let it be as it is and try to preserve it. What do you guys think?


Wednesday, October 27, 2010
DIY herb garden

I want a pet. A cat, dog, rabbit, parakeet, I don't care what. But unfortunately the house is a mess and I don't have a job, both of which are deterring us from adopting a little something furry. I am looking for a job, to those who are interested, I have been applying and making calls, dealing with rejection. Don't give up on me though! I'm coming workforce! But if you do have a job opening in Sydney you would like me to hear about, just drop a me line :-)
So, the next closest thing to a pet I could think of was a plant. I am terrible with plants but I wanted to give this another shot. When I say terrible, I mean awful. I once had a plant that committed suicide, when I got home it was there, dead, on the floor. It had jumped all on its own accord.
This time I wanted to do it properly, and ask for help, not just online help but human help. So I went to a nursery to talk to someone about how to grow a herb garden. Because that is what you do with your pets, right? you eat them.
The first thing the nursery employee did was laugh hard on my face at the way I pronounced "herb". I said "erb" as if the 'h' was silent (which by the way it is in my mother tongue). After she dried her tears and got a hold of herself, she made the point to mock me some more by continually repeating "H-erb garden", you want to grow "HHH-erbs, for a HHHHHHH-erb garden".
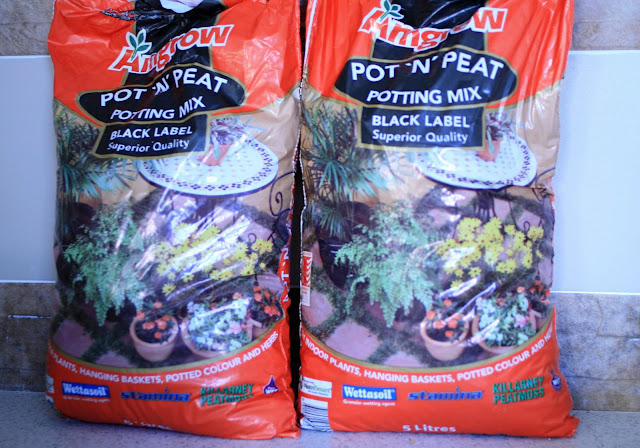
Then she said all I need is water, sunshine, a good pot, and good soil. AHA!!! soil!!!! I never did anything special about soil before I just used dirt. I am sure some of you guys learned this in kindergarten but I didn't. Potting mix comes already fertilized and contains some fancy shmancy slow release nutrients which keep the soil rich and tasty for 6 months, aka a full harvest. I bought the *premium* potting mix, nothing less for my little friends. I bought 10 liters but ended up using slightly less than 5.
I chose my favorite herbs first: cilantro (here referred to as coriander), parsley, basil, rosemary and lemon thyme. I was going for thyme when I picked the plant, but turns out I chose lemon thyme: looks like thyme but smells and tastes like lemon. Your tastebuds will be tripping. The lady told me I could chose anything except for mint. Mint grows tall and the roots deep, like a weed, and it will take over the soil and sunshine in a garden. Therefore mint should always be planted isolated from other herbs and vegetables.

I chose the pot on her recommendation. This pot has a compartment or cavity at the bottom, where water sits and keeps the roots moist. This mechanism prevents both over and underwatering. The big problem with overwatering in case you didn't know, is that if water stagnates around the roots, these will rot and the plant goes to plant heaven. Note: this little cavity might be a breeding ground for mosquitos later in the summer, so if possible it should be covered with a mesh so the air can still flow.

Now fill the pot almost to the top with your mix, and I recommend you leave a lot more room than I did in the picture. After wards I had to take about half of that out, I forgot that the plants are attached to some soil of their own as well.

You have to losen the dirt around the roots a little bit and transfer to the new pot. then cover them up with more of the potting mix. And voila!!! Place them in a spot where the sun will hit directly for most of the day. I guarantee that if your herbs are in partial shade they will die. Been there done that.

Another tip I learned is to water the herbs once a day either early in the morning or late in the afternoon. Apparently they don't like it if you water them in the middle of the day when the hot sun is blazing.
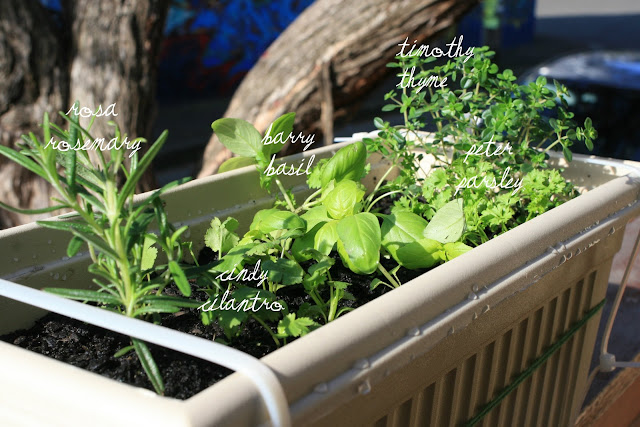
Yes I named them, so what? Don't you name your pets?
Friday, October 22, 2010
Sweets
I like cakes. Even more than cakes, I like cupcakes. I love frosting on cakes and cupcakes. Mmm...
I wanted to post some pictures of cakes I made, so that they would be on the web somewhere... And we're going to start right here.
I made this for my last birthday:

It was chocolate cake with raspberry buttercream frosting. Covered in green fondant and the flowers are made out of marzipan.
This one was for a 4th of July bbq. It's a terrible background, but I was trying to avoid taking shots of the living room this time.

It was a chocolate cake with chocolate buttercream frosting. Red, white and blue fondant was used for decoration.
I once also made a couple of dozens of these little guys:

I called them the mini-moccha cupcake. It was chocolate (ahem, again) with espresso buttercream frosting and some toasted hazelnuts sprinkled on top.
I want to make more. I want to make them all the time.
Tuesday, October 19, 2010
My blog, beautified....
Thanks guys for your feedback on the blog image. I have decided on this (for now... until I learn more about html and css).
I hope you like it (I actually like it kind of a lot). Get out of your Google readers and enjoy the new look at least once!
<3
I hope you like it (I actually like it kind of a lot). Get out of your Google readers and enjoy the new look at least once!
<3
Irish Beef Stew
I'm sick :-(
I went to bed last night with a sore throat and woke up this morning with a cold.
Yesterday there wasn't a single cloud in the sky and the temperature was warm, today the weather is super gloomy and freezing cold. I stayed in bed, taking my meds and drinking fluids all morning and then came across this recipe. Instant craving, I had to have it.
M and I bought a casserole at Victoria's Basement because it was a *super* deal. We have been looking for one for a while but they were all too expensive. Well this one from Benzer was $450 marked down to $70, so we took it home and I had been looking for a stew recipe for some time in order to honor the pot's maiden voyage. Here is where the Irish Beef Stew comes in. I made tiny adjusments to the recipe above, so I will describe my version here.
{ingredients}
- 2 generous tablespoons of butter
- 2 chopped carrots (roughly 2-3 cups)
- 1.5 kilos (just over 2 pounds) of chopped potatoes, again, roughly
- 1 large onion chopped
- 1/4 cup of olive oil
- 500 grams of beef chuck for stewing, cut into 3 cm (1 inch) pieces
- 7 cloves of garlic
- 6 cups (1.5 liters) of beef stock
- 1.5 cups of Guiness Ale
- 1.5 cups of red wine (I used local cabernet sauvignon)
- 2 tablespoons of tomato paste
- 1 tablespoon of sugar
- 1 tablespoon of dried thyme leaves
- 1 tablespoon of Worcestershire sauce
- 2 bay leaves
Note: I purchased all the ingredients for less than $25, and the bottle fo wine was $15, making it a $40 meal that serves 4-6 people!!!
{preparation}
The recipe required the use of two pots, one for cooking the meat and one for the veggies. I only have one pot so I cooked the veggies first and then proceeded with the rest of the recipe.
Clean your veggies and chop them. Notice that I chopped everything, even the beef, with my trusty Swiss army knife! We own nicer knives than that, but they are somewhere in the middle of the ocean on their way to us and I forbid M to buy another new one...
Now if this looks like a lot of vegetables is because it is!!! Next heat up the pot on medium heat and melt the butter. Add the veggies and cook until soft but not completely cooked through... or just for 20 minutes. Stir constantly.
I put the veggies aside and washed the pot. While it was soaking, I went ahead and cut my meat and salted it slightly and chopped my garlic. The meat should be fatty aka marbled (if you want to be fancy), but mine had 2 big chunks of fat that I removed. I also prepared the rest of the ingredients for the stew.
Heat up the pot again on medium heat, add oil and wait for it to be actually hot. You want the meat to sizzle when it hits the pan. I worked in batches like the recipe suggests, you want the meat to brown, not steam.
When all the pieces were nicely finished I put them all together in the casserole. You add the garlic and it will produces a heavenly smell... try to scrape (with a wooden spoon) the meaty bits at the bottom. If some of them are really stuck, just ad a bit of the beef stock and try again.
At last you add the rest of the ingredients: beef stock, wine, beer, tomato paste, worcestershire sauce, sugar, thyme and bay leaves. Bring to a boil and reduce the heat to low. Cover and simmer for 1 hour. Stir every 20 minutes or so... omg... the aroma...
We have not forgotten the veggies!!! After the hour has passed add the vegetables and simmer, this time uncovered, for 40 more minutes.
It smells amazing up in here... I scooped out some of the fat that forms at the top, I want to keep this minimally healthy. Finally time to serve, make it special with some parsley, that's right you deserve it.

PS. I used M's Canon 30D to take these shots, so you should see a considerable improvement in blog photo quality!
Subscribe to:
Posts (Atom)